-
Kangkam -
Squid is opensource software that use by many server for :
1. control an internet access
2. share bandwidth
3. faster loading process for a website that have open before
4. etc... :D
You can download a squid for windows version
here or
here
Now this is the step by step configuration :
download squid-2.6.STABLE18-bin-DELAYP.zip
extract to C:
enter C:\squid\etc folder
open squid.conf.default and save as to squid.conf
open mime.conf.default and save as to mime.conf
open cachemgr.conf.default and save as to chachemgr.conf
open squid.conf with notepad or wordpad
press ctrl + F buttons (to search a word)
find
our_networks word
#acl our_networks src 192.168.1.0/24 192.168.2.0/24
#http_access allow our_networks
delete # / uncomment them, so it will be like this :
acl our_networks src 192.168.1.0/24 192.168.2.0/24
http_access allow our_networks
press ctrl + F button again
find
visible_hostname word
# TAG: visible_hostname
# If you want to present a special hostname in error messages, etc,
# define this. Otherwise, the return value of gethostname()
# will be used. If you have multiple caches in a cluster and
# get errors about IP-forwarding you must set them to have individual
# names with this setting.
#
#Default:
# none <-- change="change" font="font" style="font-style: italic; font-weight: bold;">#none
with ... i.e. localhost
# TAG: visible_hostname
# If you want to present a special hostname in error messages, etc,
# define this. Otherwise, the return value of gethostname()
# will be used. If you have multiple caches in a cluster and
# get errors about IP-forwarding you must set them to have individual
# names with this setting.
#
#Default:
visible_hostname localhost
press ctrl + F button again
find
dns_nameservers word
# TAG: dns_nameservers
# Use this if you want to specify a list of DNS name servers
# (IP addresses) to use instead of those given in your
# /etc/resolv.conf file.
# On Windows platforms, if no value is specified here or in
# the /etc/resolv.conf file, the list of DNS name servers are
# taken from the Windows registry, both static and dynamic DHCP
# configurations are supported.
#
# Example: dns_nameservers 10.0.0.1 192.172.0.4
#
#Default:
# none
change
#none with your dns server (i.e. : 202.134.0.155 or 202.134.2.5 or 208.67.222)
# TAG: dns_nameservers
# Use this if you want to specify a list of DNS name servers
# (IP addresses) to use instead of those given in your
# /etc/resolv.conf file.
# On Windows platforms, if no value is specified here or in
# the /etc/resolv.conf file, the list of DNS name servers are
# taken from the Windows registry, both static and dynamic DHCP
# configurations are supported.
#
# Example: dns_nameservers 10.0.0.1 192.172.0.4
#
#Default:
dns_nameserver 208.67.222.222
save and close squid.conf document
enter
c:\squid\sbin directory
type
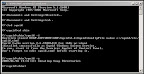
C:\squid>sbin\squid.exe –i
then type
C:\squid>sbin\squid.exe –z
open start menu - setting - control panel - administrative tools - services
find service squid
click start
open browser (i.e. mozilla)
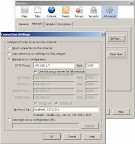
choose from menu bar : tools - option - network - setting
choose manual proxy and enter your computer ipaddress with default squid port (3128)
press ok and ... browsing :)
have it try ...
-
Kangkam -